
Maintenance You Can Actually Reach: Yacht-Inspired RV Design That Saves You Money When Things Break In The Wild
On a 74-foot Hatteras, you learn one thing very fast: if you can’t reach it, you can’t fix it. And if you can’t fix it, it will fail at the worst possible time—usually in a tight marina with people watching.
The same rule applies on the road.
Most RVs are built like someone asked, “How pretty can we make this?” instead of, “Can a human adult actually service this?” Panels are buried. Wires vanish into walls. Plumbing runs like a plate of spaghetti. The result: every breakdown costs more, takes longer, and ruins more trips than it should.
The good news? You don’t need a custom yacht or a six-figure overland rig to fix this. You just need to start thinking—and building—like a boatyard.
Here’s how yacht-style access design, service loops, and label discipline can turn your RV into something you can actually maintain in the wild.
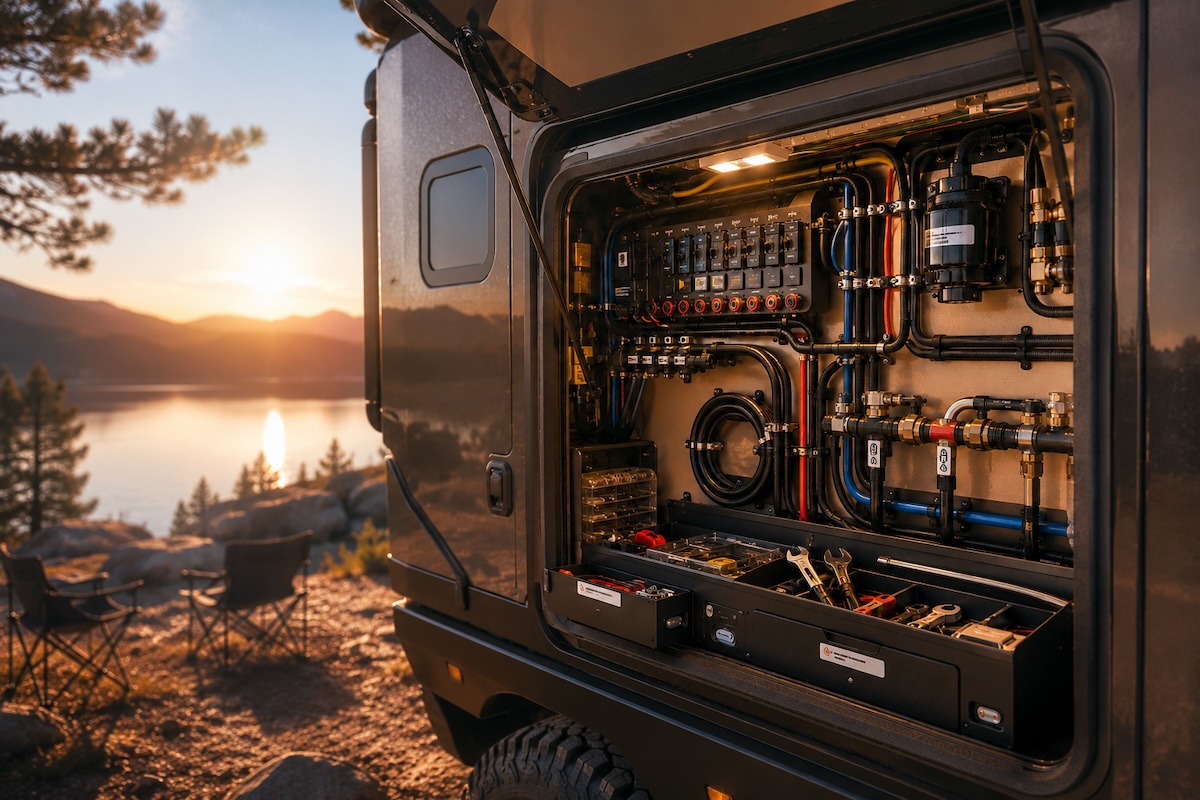
Think Like a Boat Builder: Access First, Aesthetics Second
On a yacht, every system is crammed into a fiberglass shell that can’t be expanded. That forces designers and owners to obsess over access:
- Can you reach every filter?
- Can you pull every pump?
- Can you service every connection without dismantling half the interior?
That mindset is pure gold for RV owners.
Start with a brutally honest “access audit”
Take an afternoon and crawl your rig like a surveyor:
- Electrical – Can you reach fuse panels, battery terminals, inverters, converters, solar charge controllers, and major junction points without removing furniture?
- Plumbing – Can you get to water pump, filter housings, PEX manifolds, shutoff valves, and tank fittings with tools in hand?
- Propane – Regulator, main valves, key connections. Could you shut off or swap something quickly in a campground or on a forest road?
- Critical fasteners – Seats, steps, bed platforms, outdoor kitchens, bike racks. Are you able to tighten or remove them without specialty gymnastics?
Anywhere you catch yourself saying, “Well, kind of… if I pull this panel, and that trim, and maybe the fridge,” put it on a list. Those are your access projects.
Yacht-Inspired Access Design for Your RV
You don’t have to rebuild the rig. You just need to give yourself intelligent openings and straightforward paths.
Add service panels where you actually need them
Boat owners cut in access ports all the time. You can do the same in an RV:
- Behind a shower wall where the plumbing lives
- Under the bed over the water tank or pump
- In the floor above tank sensors or wiring runs
- Inside cabinets to reach hidden junction boxes or appliance connections
Use marine deck plates (twist-out plastic hatches) or carpeted/finished hatches with proper framing. It looks intentional—and it is.
Key rule: If a component is likely to fail or likely to need service, you should not have to tear apart structure to reach it.
Give components “elbow room”
Tightly packed looks clean when you pick up the rig. It’s a nightmare the first time a hose clamp lets go.
Borrow from yacht engine rooms:
- Leave a few inches around pumps, filters, and valves.
- Mount components on removable boards screwed to backing plates, so the whole assembly can come out for service.
- Avoid stacking three systems in front of each other (water heater blocking wiring blocking storage). If you must stack, make the front layer removable with a few screws—not permanent adhesive and creative swearing.
Service Loops: The Cheap Insurance Nobody Talks About
On Empire, every pump, panel, and sensor has slack in the wiring or hose—just enough to pull it out, work on it, and put it back without ripping connections out of the wall. That slack is called a service loop, and it’s one of the most powerful (and cheapest) upgrades you can copy.
What a good service loop looks like
- A gentle “U” or circle of extra wire or hose, secured but not strangled
-
Enough length to:
- Remove a pump or fixture
- Set it on a towel or tray
- Work on it with two hands
- No sharp bends, pinch points, or tight zipties
Where to add them in your RV
Start with your usual suspects:
- Water pump and filters – You will replace these. Give yourself slack.
- Toilet and sink connections – Enough hose to pull fixtures for repair or replacement.
- Appliances – Fridge, water heater, furnace, AC units, fans.
- Battery and solar systems – Charge controllers, shunts, battery monitors, DC distribution blocks.
When you upgrade gear, don’t cut everything “perfectly to length.” That perfection is how you end up splicing wires in a gravel pull-out in Utah.
Label Discipline: The Difference Between a 10-Minute Fix and a $400 Shop Visit
On the yacht, we label everything. Wires. Valves. Breakers. Mystery boxes. Is it overkill? Yes. Is it why emergencies feel manageable instead of terrifying? Also yes.
RV builders rarely do this well. That’s your opportunity.
What to label
At minimum:
-
Electrical
- Battery banks (house vs chassis)
- Main positive and negative bus bars
- Fuses and breakers (what they feed, not just “15A”)
- Solar components and disconnects
-
Plumbing
- Fresh tank, grey, black
- Fill valves and diverters
- Pump in/out, filter in/out
- Any bypass or winterizing loops
-
Propane
- Main shutoff, branch lines to appliances
-
Mystery switches and relays
- Anything you’ve had to “figure out once.” Don’t rely on memory.
Use a handheld label maker or marine-grade wire labels, not masking tape from 2023 that turns into beige goo in the first heat wave.
Label your logic, not just your hardware
Don’t just write “Pump.” Write:
- “Fresh water pump – 12V – Fuse 15A – Panel 2, Pos. 5”
You want future-you, in the dark, in the rain, to know:
- What this thing is
- Where its power comes from
- What to shut off if it goes weird
How This Pays Off When Something Breaks in the Wild
Picture two versions of the same breakdown on the road.
Scenario A: The typical RV
The water pump starts screaming and dies in a national forest campground.
- You don’t know which panel feeds the pump.
- The pump is buried under the bed behind nailed-on trim.
- The wires are cut to perfect, zero-slack length.
- Nothing is labeled.
Now you’re:
- Guessing fuses
- Ripping trim
- Cutting and re-splicing wires you can barely reach
- Burning half a day and your mood
Scenario B: The yacht-inspired RV
Same failure, different prep.
- Panel breaker labeled: “Fresh Pump 15A”
- Pump mounted on a removable board under the bed
- Access hatch with room to work
- Hoses and wires with service loops
- Label on pump: “Shurflo 4008 – 7.5A – 1/2” barb”
Now you:
- Kill the breaker
- Open one hatch
- Undo four screws and two hose clamps
- Swap the pump (you carry a spare because you’re that level of prepared now)
- Test, close, done
It’s a 30–45 minute annoyance instead of a trip-threatening crisis.
Where to Start: A Simple Upgrade Roadmap
You don’t have to tear your rig apart. Start small:
-
Label weekend
- Label electrical panel, valves, tanks, and the obvious stuff.
- Make a quick printed map or diagram and tape it inside a cabinet.
-
Top three access projects
- Pick the three most critical/hardest-to-reach systems: usually water pump, batteries, and a major appliance.
- Add access panels or make removable covers.
-
Service loops during every upgrade
- Any time you touch wiring or plumbing, add slack and secure it cleanly.
- Future-you will say thank you out loud.
-
Create a “systems logbook”
-
A simple binder or digital note with:
- Model numbers
- Install dates
- Filter sizes
- Fuse sizes
- This is pure yacht life stolen for RV sanity.
-
A simple binder or digital note with:
If you want to see how this actually plays out between a 74-foot Hatteras and a towable home on wheels—the ugly fixes, the smart upgrades, the occasional “why did they build it like that?”—stick with Anchors to Axles.
We’ll keep sharing the real work behind the pretty views, so your next breakdown on the road or at the dock is faster, cheaper, and a lot less painful.